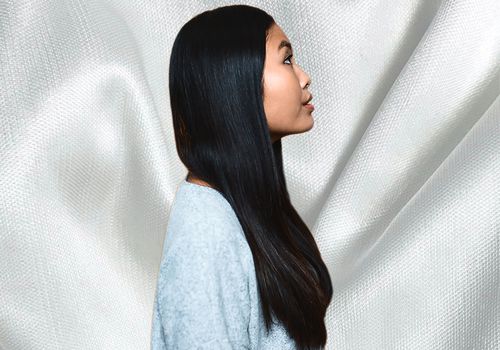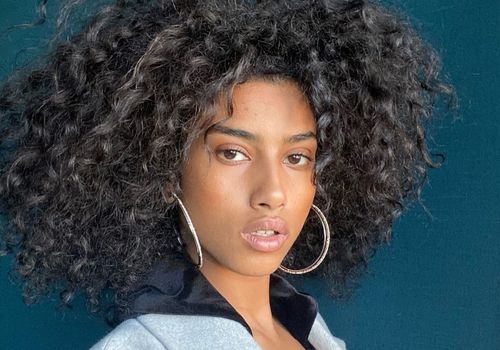

Curly hair is a blessing, but it's not always easy to manage. Once you've mastered what works for your curls, it can be tempting to stick to one or two basic styles—but you certainly don't have to. Need proof? Just take a cue from each of the looks below. Each of these red-carpet-worthy styles is easy to replicate.
Curious to see which celebrities and influencers have inspired us with their effortless 'dos for curly hair? We've found you a wide variety of looks to choose from and chatted with hair experts Philip Downing and Kali Ferrara to get their tips on how to achieve them.
Keep scrolling to check out 30 easy curly hairstyles to do on the go.
Meet the Expert
- Philip Downing is an expert stylist and creative and education director for TIGI.
- Kali Ferrara is a hairstylist and colorist at The Salon Project in New York City.
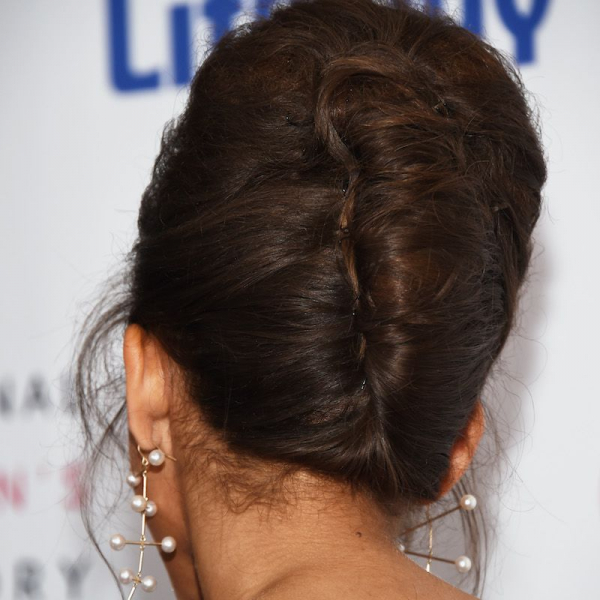
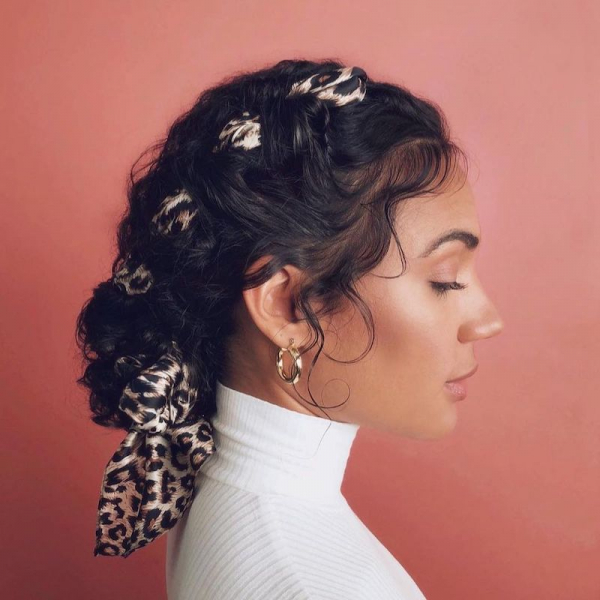
01 of 30
Romantic Updo
This updo looks romantic, but it's quite simple. Even better—it requires zero heat styling. "I love to see a loose and carefree style to naturally curly hair, so the hair still moves and has personality," says Downing.
- After letting hair air-dry and applying a curl-defining cream of your choosing, gather hair into a ponytail halfway between the nape and crown of the head.
- Wind the ponytail around the base of the hair tie to form the bun.
- Use three to four bobby pins to secure into place before misting with hair spray to lock everything in. (Don’t worry about the hairline—flyaways make the look more relaxed, i.e., romantic).
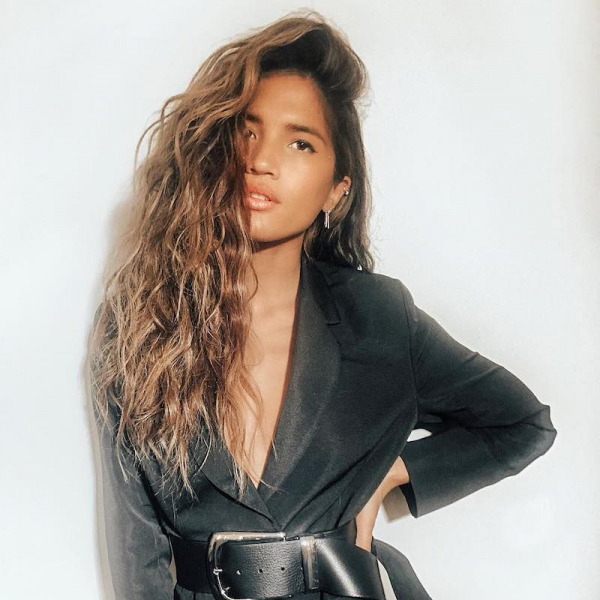
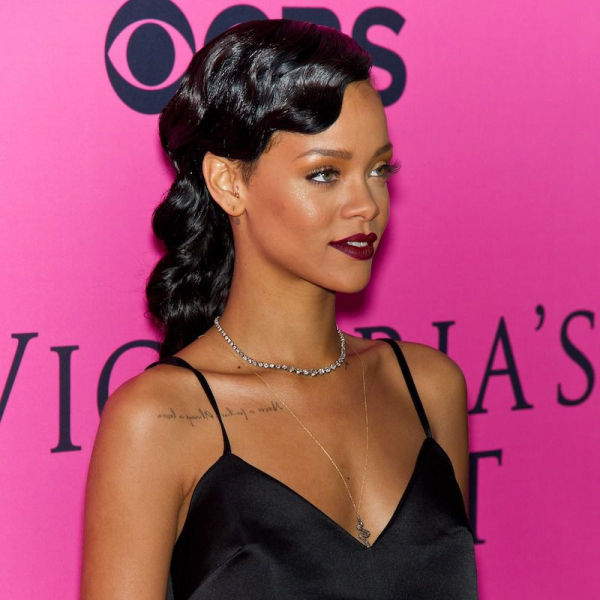
02 of 30
Sky-High Pony

According to Downing, taking inspiration from the '90s for updos is trendy. The beauty of this hairstyle is how easily you can dress it up or down depending on the event. Pair it with a bright lip and some overalls for a funky, casual look. Or go the evening route with a clean cat eye and an LBD. Either way, the style takes about three minutes to execute.
- Tease the hair if you need to create more lift and volume at the crown. “Teasing the hair to intentionally give that ‘bedhead’ feeling is what really progresses the updo,” says Downing.
- Gather your hair into an ultra-high ponytail at the crown of your head and secure it with an elastic.
- Stick two or three vertical bobby pins on the underside of the ponytail to keep the elastic lifted.
- To keep your curls nice and bouncy, enhance the ends with a curl-defining cream.
You can also prep damp curls with a curl-defining cream if you plan to wash it before styling.
03 of 30
One-Minute Side Braid
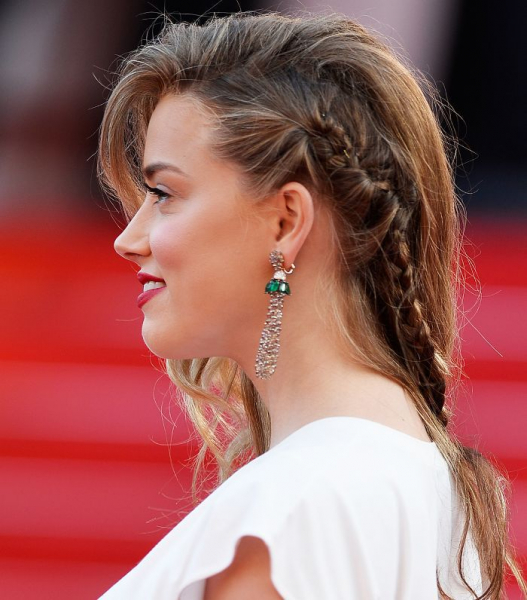
Don't be intimidated by how pretty this half-back hairstyle is. It takes 60 seconds.
- If you're starting with freshly washed hair, grab a curl-enhancing wave spray, scrunch through damp hair, and then let air dry.
- Part your hair naturally. Then grab a small section of hair on just one side of your head and begin braiding back toward the crown of your head.
- Once you've gotten to the back of your head, pin the section of hair to secure the style before pulling top layers of your hair over it, so the pins are camouflaged by your curls. Voilà! You've got a model-worthy hairstyle à la Amber Heard.
04 of 30
Sleek Updo
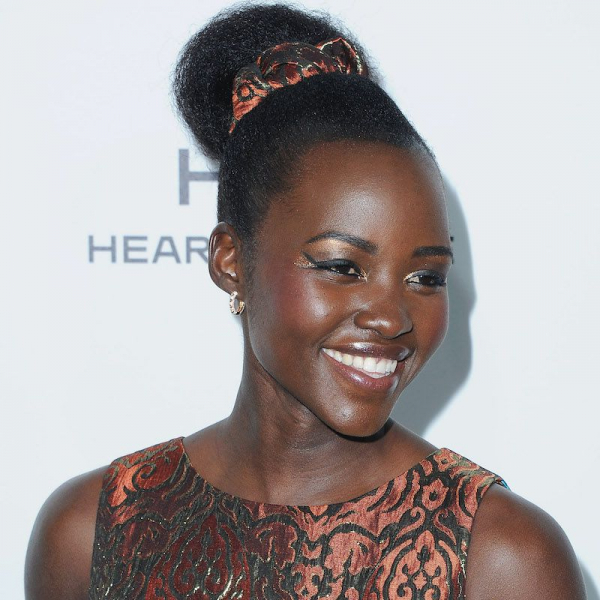
This effortless style perfectly suits a summer party or festival. (Plus, your bone structure will really shine.) To make it even funkier, secure with a chic, elevated scrunchie like Lupita Nyong'o did on the red carpet.
- Start by brushing your hair to ensure a smoother texture. Like with look #2, you can tease the crown to create a lift.
- Brush up into a high ponytail and secure with an elastic.
- Divide the ponytail in half and twist those two sections into a thick, messy twist.
- Use bobby pins to secure the bun to your head and adjust the shape and size. Add the scrunchie and wrap it around the bun until it’s secure.
- Smooth down any flyaways with styling gel. Mist all over with an oil like Bumble and bumble’s Invisible Oil UV Protective Dry Oil Finishing Spray ($34) for shine.
05 of 30
Messy Half-Bun
Half-buns somehow look good on every hair texture and length, which is probably why the look isn’t going anywhere. To get the look, follow Ferrara’s advice:
- "Gently gather the hair curl by curl starting from the center top of the head down to where both ears are, to the center of the head just below the crown."
- "Make sure to keep an eye on the silhouette to keep it balanced from side to side and to avoid having uneven bumps throughout."
- Don't worry about keeping it too neat, and "make sure to have no hard lines or partings when pulling the hair back to keep the look looking messy and effortless."
- Twist the ponytail around itself and then coil it toward the base until you have your bun. Ferrara suggests using a clip or barrette to secure. "A hair tie or scrunchie would work to fasten the hair, but it could cause the style to lose its messy or looser look."
06 of 30
Low Bun With Braids
Here's a genius hairstyle that's especially great for those with curly hair and natural texture. Yara Shahidi epitomizes this look beautifully.
- Start with braiding your entire head of hair. This style makes use of cornrows, which may require a salon trip if you're not an advanced braider.
- Next, pull braids into a low ponytail or bun, leaving a few out before securing.
- Wrap the left-out braids around the base of the bun.
- Lock it in with a couple of bobby pins.
07 of 30
Headband
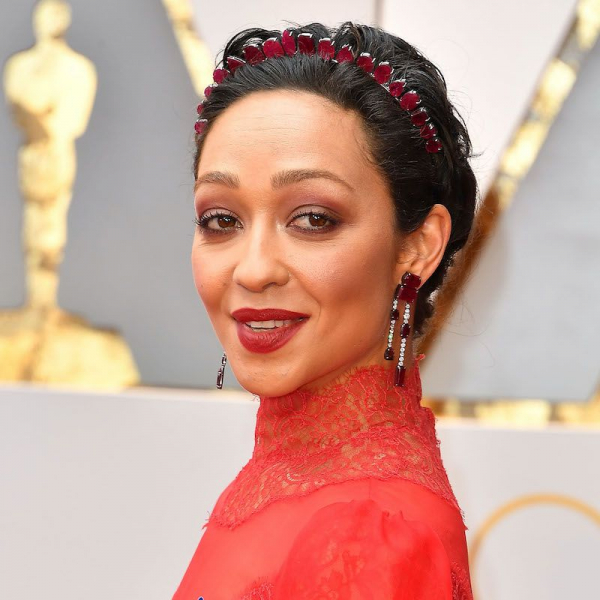
We're consistently inspired by Ruth Negga's minimalistic approach to gorgeous curly hair. Here, she proves you don't necessarily need a lot of length to elevate your look.
- Let your hair air-dry before prepping it with a curl-defining cream. Moroccanoil’s Curl Defining Cream ($36) is a well-loved favorite and also happens to smell amazing.
- Now all you have to do is add a headband of your choosing! (We love the subtle camouflaged vibe of Negga’s.)
08 of 30
French Twist
Despite appearances, it doesn’t get much easier than Zendaya’s eye-catching French twist. This style is great, as it works better with unwashed hair. The rules stay the same regardless of texture—be it curly and thick or straight and fine.
- Apply a dry shampoo (Like Bumble and bumble’s Prêt-à-Powder, $28) throughout the hair—especially at the root to maximize volume and body.
- Then rake strands back into a mid-height ponytail, stuffing it into a French twist. Secure with three large hairpins at the top, middle, and base of the twist.
- Use your fingers to deconstruct the look a bit, tousling some flyaways and tendrils at the nape of the neck and around the hairline. Leave as is or finish with a spritz of flexible-hold hair spray. (We like Bumble and bumble’s Spray de Mode Flexible Hold Hairspray, $32.)
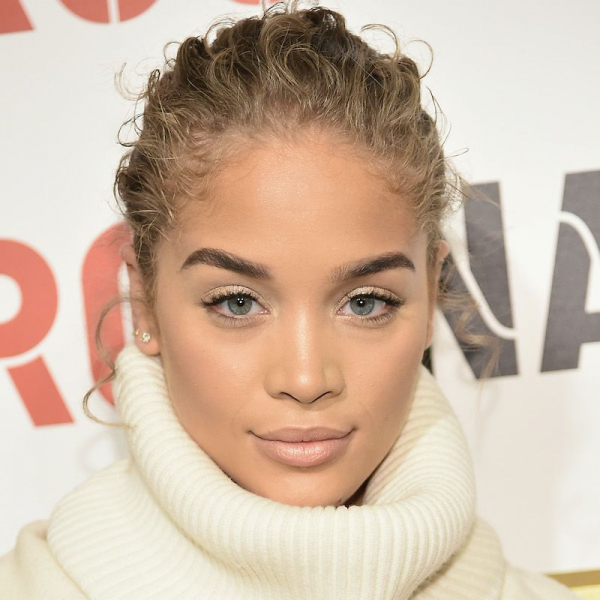
09 of 30
The Classic Slick-Back
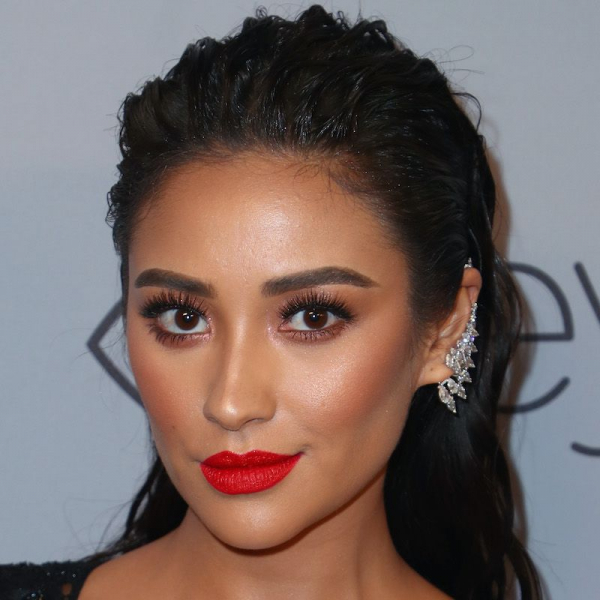
Surprise: A sultry slick-back doesn’t require slippery straight locks. We think the look is even better paired with curly hair and natural texture. We’re inspired by Shay Mitchell’s approach, as it’s the quintessential style when you’re looking for a hit of glamour sans the fuss. Plus, it couldn’t be easier.
- Let hair dry, and then grab a high-quality boar bristle brush.
- Work a styling gel through strands and simply brush back to smooth and slick back curly hair.
10 of 30
Faux Bangs
Long curly hair gives you the unique opportunity to fake a fringe. This tutorial by hairstylist Irinel de Leon shows you how to get the look:
- Pull your hair up into a high ponytail, securing it with a non-damaging hair tie.
- Bring most of the hair from the ponytail forward so that it drapes across your forehead.
- Roll up a silk scarf or bandana and tie it around your head so that the knot is in front. This bi-sects the hair, intensifying the pseudo-bang effect.
- Use your fingers to adjust any stray pieces, misting the hair with water in areas that need reviving.
11 of 30
Wide-Brimmed Hat

Tucking your curls under a hat like Janelle Monáe does here may seem like an easy fix on bad hair days, but be careful. "Hats are so tough when it comes to curly hair because you feel like you have to fully commit to one to shade your eyes or keep your head warm," says Ferrara.
- "For a summertime look at the beach, pool, or golf course, visors are back in style and can shade the eyes but not squish the hair. There are some cute ones out there."
- "For the winter, a warm hat like a beret is a great option to keep your curls from getting squished like it typically would underneath a beanie."
- A wide-brimmed hat that sits more lightly on top of the head and doesn't flatten your curls too much is another stylish option.
12 of 30
Banded Ponytail
The banded ponytail is a cute style for natural curls. Follow this tutorial from Laulanne Cecilia:
- Start with completely dry, clean hair.
- Apply a little bit of gel around the crown of the head, brushing it through.
- Comb the top half of your hair back into a high ponytail, leaving the rest down for now.
- Then create a second ponytail lower down on the scalp, attaching it to the first one.
- Repeat this one more time until you have three linked ponytails connected by a bubble of hair.
- Continue adding elastics to the bottom of the ponytail every few inches until you reach the end.
- Fluff out the bubbles between bands to create volume.
13 of 30
Sleek Pouf
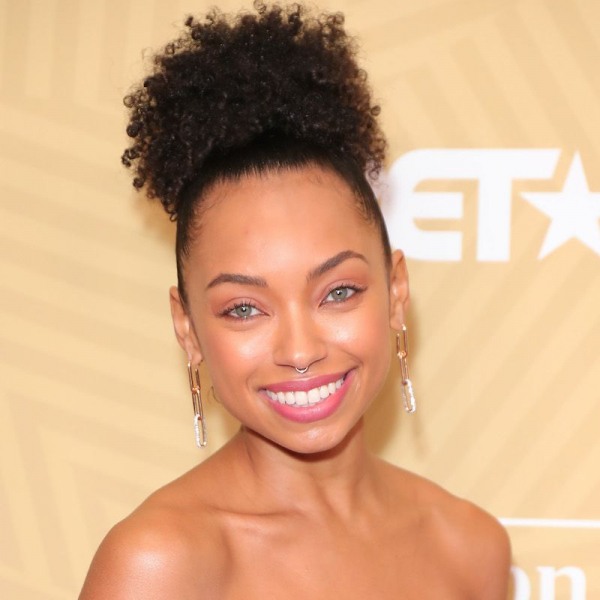
In a pinch, Logan Browning's pouf is a super easy updo to recreate for formal or casual occasions. Take Downing's advice for copying the look:
- “Work with a smoothing oil such as TIGI Copyright Lustre Oil ($18),” says Downing. He says to distribute the product from roots to mid-lengths.
- Then, “with a soft brush, gather all the hair from roots to your opposite hand positioned at the high crown.”
- “Neatly gather the hair to this point, secure with a hair tie, then visually dress the bun and pin back onto itself,” says Downing. Touch it up using your fingers to make sure the hair lays the way you want it to.
- Finally, “secure with Bed Head by TIGI Masterpiece Extra Strong Hold Hairspray ($20).”
14 of 30
Voluminous Half Up
A messy half-up/half-down style hinges on choosing the right products. Follow the instructions for #5, but be sure to back comb the areas you want volume before securing your hair back. In terms of products, use a generous coat of texturizer like the Ouai Air Dry Foam ($28) as well as a statement-making accessory, if you so choose.
15 of 30
Deep Side Part
Romantic waves with a dramatic side part is a look that never fails. To DIY, follow Ferrera's tips:
- "For curly hair, use your natural texture to your advantage," says Ferrera. "Use a curling iron or wand to enhance parts that may have fallen flat, flip over and spray with flexible hairspray for some added volume."
- Adding more flexible hold hairspray, "use a boar bristle brush to lightly brush out the curls."
- "On the shallow side of the part, you can fasten the hair behind your ear with pins or a comb with some sort of embellishment."
16 of 30
Frizzy Half-Up/Half-Down

Brush out your curls before pulling them back into a half-up/half-down using the steps from #5 for a trendy frizzed-out look.
17 of 30
Dainty Headband
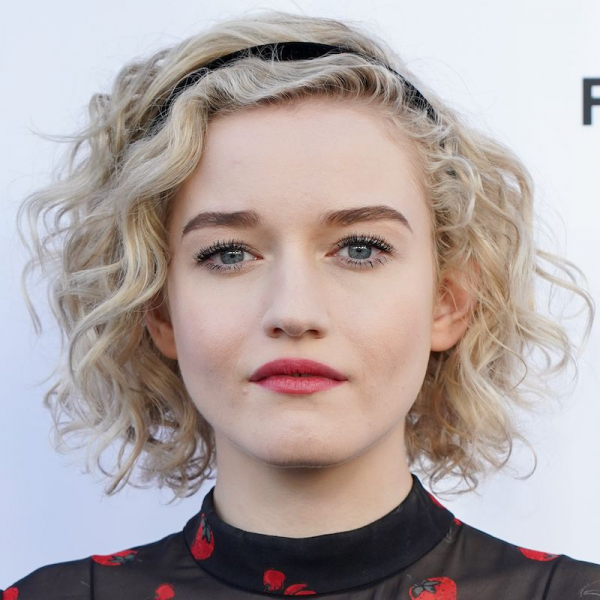
A dainty headband a la Julia Garner is the perfect match for a flirty, curly bob. Similar to look #7, this is mostly about taking care of your cut. Follow Ferrara's tips for taking care of chin-length curls:
- First, get the right haircut. “Layers are important for the curl pattern to form, whether you want more of a shag (short layers) or a bob (long layers),” Ferrara says. ” A one-length style will not well work for this length because the silhouette often turns out looking like a triangle on your head.”
- “To style these looks, it all depends on if you love to embrace your volume or if you want to have it more streamlined.”
- “Apply product all over the hair that has been only wrung out from the shower (to get better slippage for the product to be distributed).”
- “To get more volume, a curl mousse, light hold gel, or cream are best (I like the Oribe Curl Mousse, $39, or the Vicious Curl Curl Cream, $22), to have more controlled and polished curls, a gel is best (I like the Oribe Curl Gelee, $44).”
"A good stylist that knows your hair type will know what your hair needs and can do, and it is important to know and understand that with curly hair, there is no one-size-fits-all haircut," says Ferrara.
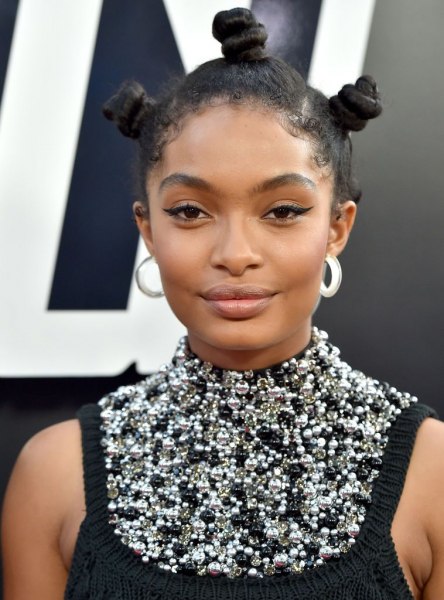
18 of 30
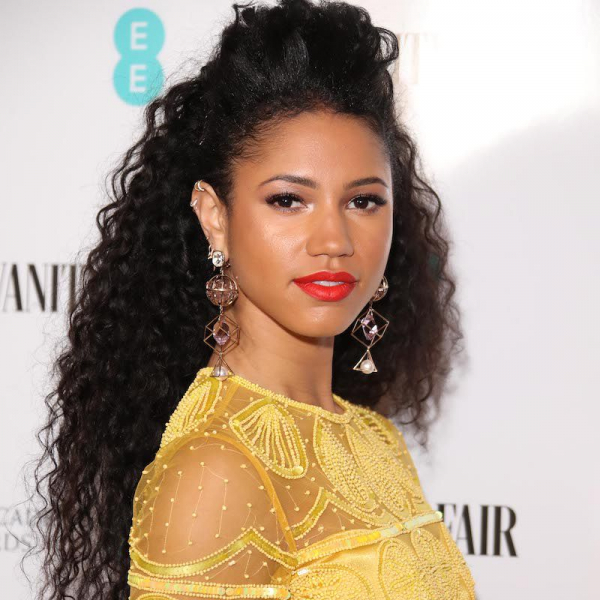
Double Buns
Space buns are very simple, with a Downing-approved '90s vibe that's both trendy and timeless. To get the look, follow his advice:
- “Product is key, and using the appropriate styling & finishing products will give the best texture to the curls.” First, apply Bed Head by TIGI’s Back it Up Texturizing Cream ($20) to wet hair.
- Next, dry your hair using your preferred method. “When drying, the trick is to try and achieve as much volume and texture as possible. This will help with the longevity and support of the buns.”
- Part your hair. Downing suggests either a center part or zig-zag.
- “Visually check in the mirror for bun placement and balance,” which will depend on your face shape and structure.
- Once you’ve decided on placement, create the buns by “gathering all the hair to the specific point of the head shape, tie with a hairband, if needed tease and backcomb for further volume/texture.”
- “Then spray Bed Head by TIGI Headrush Superfine Shine Spray ($20) and tease out to give a more natural feel.”
19 of 30
Sleek High Ponytail
If you have long hair, you can get this chic high pony following this tutorial from influencer Joyjah Estrada:
- Start with cleansed and dried curls. Using a spray bottle, mist a little water throughout to make the hair easier to work with.
- Apply a leave-in conditioner like Kiss Colors & Care Argan & Macadamia Leave-In Conditioner ($9).
- Brush your hair back into a high ponytail at the back of the head, secure with an elastic, and add some gel to control flyaways.
- Add some hairspray for a bit of oomph and volume.
20 of 30
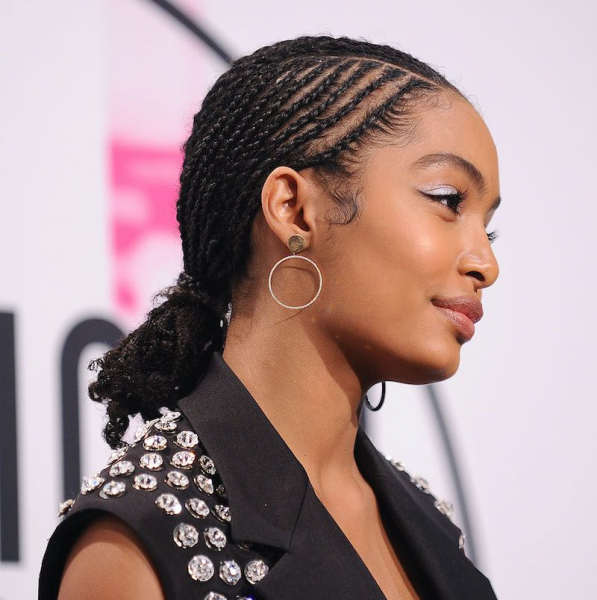
Slicked-Back Low Ponytail
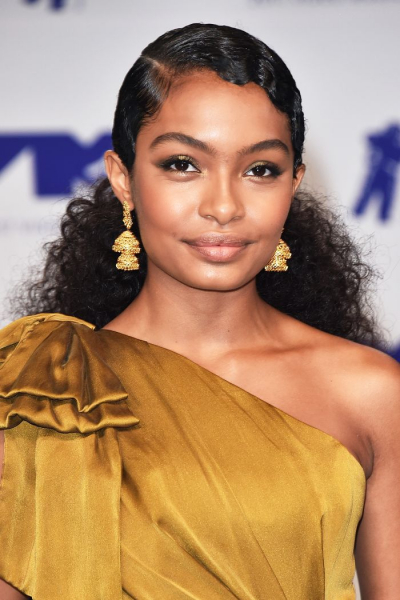
Yara Shahidi's slicked-back ponytail is similar to the high pony from look #19, only it sits lower on the back of the neck. Slick back the hair at the crown of your head with gel, brush through, and leave the rest loose and curly. Affix with bobby pins or an elastic to keep the style in place.
21 of 30
Scarf Braid
Weave a scarf through your braid for an instant upgrade. Follow this Kristin Ess tutorial for best results:
- Take your scarf of choice, making sure that it's not too thick. Fold it in half and use an invisible hair elastic to create a small loop.
- Start at the crown of the head, slipping a piece of hair through the loop and tightening the scarf to keep it in place.
- Then, braid the hair along one side, incorporating the scarf as you would a third section of hair and working down the crown of the head.
- Use the excess scarf to tie the rest of your hair into a low bun, winding the fabric around and leaving the ends dangling.
- Secure with bobby pins to make sure the scarf stays in place.
22 of 30
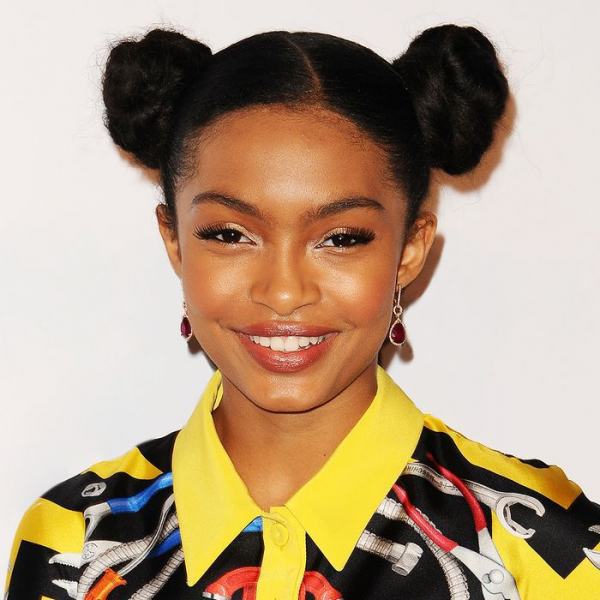
Bantu Knots
Bantu knots are an amazing protective style for natural hair. Not only is this style super chic, but it’s also healthy for your curls. They look complicated, but Bantu knots are pretty easy to do at home with some practice.
- Section your hair in the places you'd like the bantu knots.
- Twirl each section of hair until it's rope-like, then wrap it onto itself to create the knot.
- Secure with a bobby pin.
23 of 30
Mermaid Waves
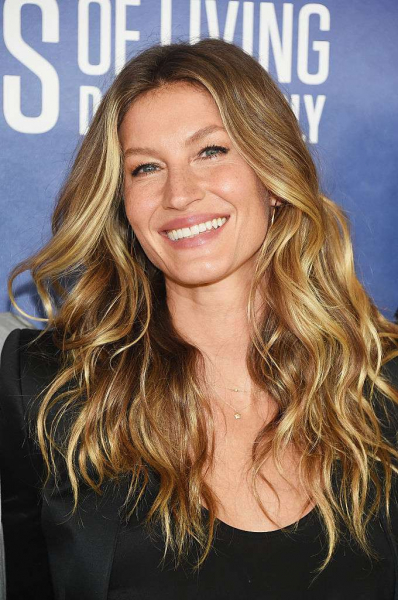
Gisele Bundchen's soft mermaid waves are beautiful on their own or paired with a hair accessory. Follow Ferrara's advice for getting this look:
- To begin, take stock of your hair texture. This will factor in when you decide how to approach these loose waves.
- “If you have a smaller coil, then a blowout will have to come first and then a styling wand to get the looser mermaid waves.”
- “On wavy hair, let it air dry with a product of your choice (I like Oribe Matte Waves, $42), then pin up the strands and use the wand for more definition.”
24 of 30
Slicked Side Part
A little gel added to the part line creates an edgy structure to tightly spiraled curls, as seen on Game of Thrones star Nathalie Emmanuel.
- Style as usual with your preferred products and drying methods, parting the hair to one side.
- Take a flexible hold gel, like Ouidad Advanced Climate Control Heat & Humidity Gel ($26), and apply generously to the area on either side of the hair part and along the hairline.
- Brush the gel through to distribute. You can also add a few bobby pins to further secure.
- Style your edges if you wish.
25 of 30
Finger Waves
Finger waves look amazing on any length of hair. They take a bit of patience, but the results are worth it. This tutorial by stylist Ted Gibson shows you how:
- Using ample gel and a comb, create the S-shaped waves on damp hair.
- Gently clip finger waves into place with metal salon clips.
- Braid the rest of the hair to encourage a looser wave pattern.
- Either air dry or use a blow dryer to speed up the process. Then, take down the braids and clips.
26 of 30
Brushed Out
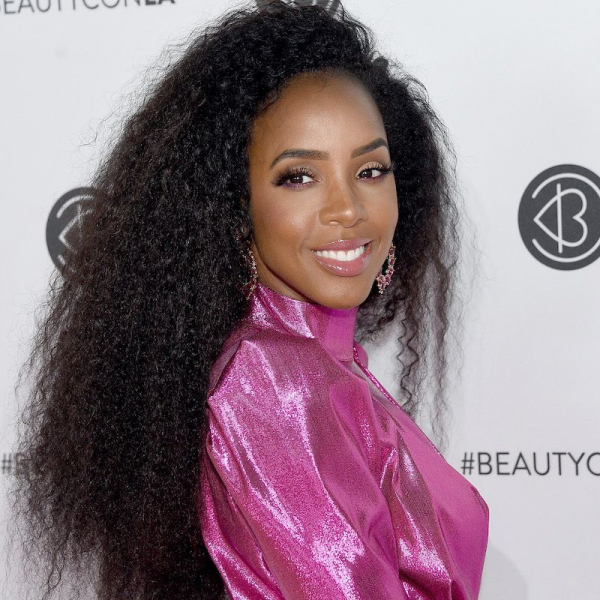
Take a page of Kelly Rowland's book and embrace a bit of sexy frizz by brushing out your curls.
27 of 30
High Half Ponytail
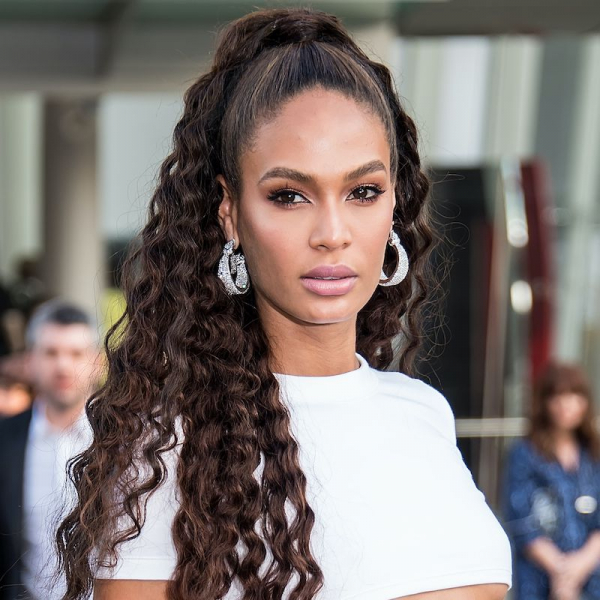
Joan Smalls' super high half ponytail will probably require some extensions to get the full length. Follow the steps from #19, placing the hair at the crown of the head rather than the back.
28 of 30
Vintage Scarf
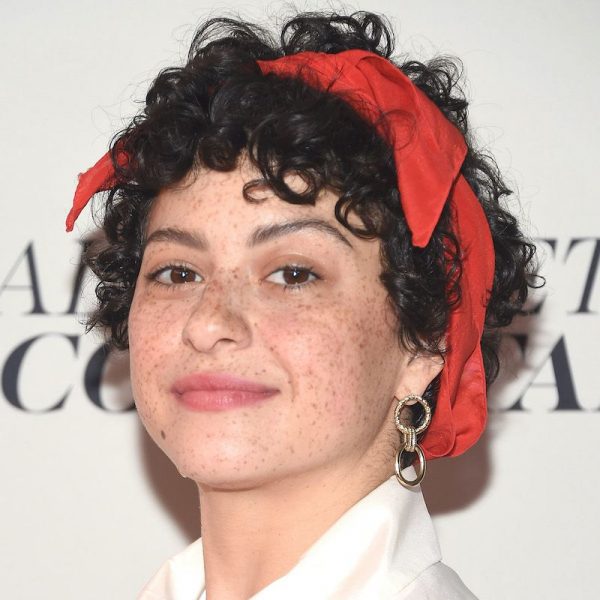
Channel Betty Boop like Alia Shawkat with a fire engine red scarf—the perfect style for a short crop. Follow Ferrara's advice for styling a scarf with curly hair:
- "Grab a square scarf, fold it diagonally, starting from the longer end of the triangle."
- "Fold the scarf down into 1-1.5-inch folds until the point is the top layer."
- "Put the part with the point at the nape of your neck and then tie it at about an inch from your hairline on top of your head."
- For short hair like Shawkat's, you don't have to do much. If it's longer, "slick it back with a middle part, gather the ponytail, then place the scarf around it until the whole scarf is almost an extension of your hair, then twist as you would to make a bun and use a hair tie to fasten—your bun will look like the scarf!"
29 of 30
Unraveled Braids
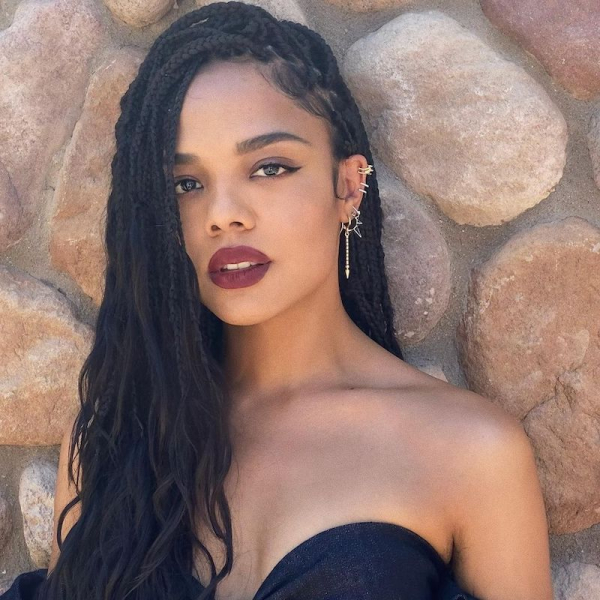
Unraveled braids like these seen on Tessa Thompson are a great option. A few things to keep in mind:
- "The braids pictured are woven tightly from the scalp with the woman’s natural hair and includes human hair extensions," says Ferrara.
- "When the braids are unraveled like this, it is usually a hair extension that has likely been treated by a relaxer to keep it as the texture you see pictured."
- "To have an unraveled look like this, smaller braids are a must, depending on your hair texture as most hair won’t stay braided with one or two large braids."
30 of 30
Pinned Back
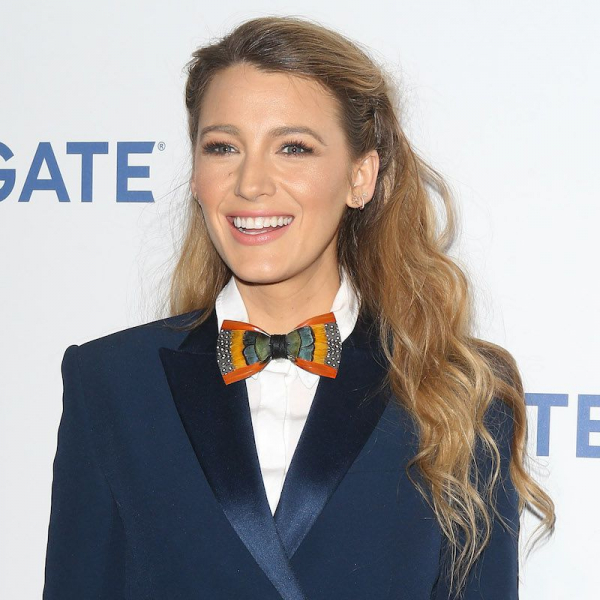
Loose, romantic waves can be held off the face with artfully placed bobby pins, as Blake Lively demonstrates here. Using the same steps from #15, change up the placement of the barrettes to alter the look.
- What's the fastest way to style naturally curly hair?
Simply air-dry your hair and add a texturizing product to show off your natural texture.
- Can those with naturally curly hair still rock a short do?
Absolutely. Pixie cuts (or everything from a bob to a lob) all look great with the added texture of natural curls
- What's the easiest way to enhance natural curls?
Use a curling iron only in some sections of the hair (to lift up what may have fallen and add extra definition). For further volume, add hairspray.